

You're standing in a crowded preparation room with your gown zipped, your doctoral hood folded over one arm, and no clear idea whether you're supposed to put it on or hand it to the faculty member waiting onstage. The lining is twisted, the velvet edge keeps rolling inward, and your outfit has no convenient shirt button for the front loop.
That situation is common because doctoral hood how to wear instructions often focus on appearance while ignoring the physical logistics. The correct approach depends on your ceremony, your clothing, your body position, and whether a faculty hooder will place the hood for you. A few deliberate checks before the procession can prevent sliding fabric, hidden colors, neck pressure, and an awkward handoff at the stage.
Table of Contents
- Understanding Doctoral Hood Dimensions and Colors
- Ceremony Logistics and the Faculty Hooder Handoff
- Step-by-Step Placement and Draping Technique
- Securing the Front and Rear Loops to Your Clothing
- Troubleshooting Common Fit and Display Failures
- Final Pre-Procession Inspection Checklist
Understanding Doctoral Hood Dimensions and Colors
The modern U.S. doctoral hood comes from a formal standardization milestone. American colleges and universities adopted an intercollegiate academic-dress code in 1895, establishing shared relationships among degree level, hood dimensions, velvet trim, and colors. That system made academic regalia readable across institutions rather than treating every hood as purely local apparel. The University of South Carolina's history of regalia describes this development and the physical conventions that followed.
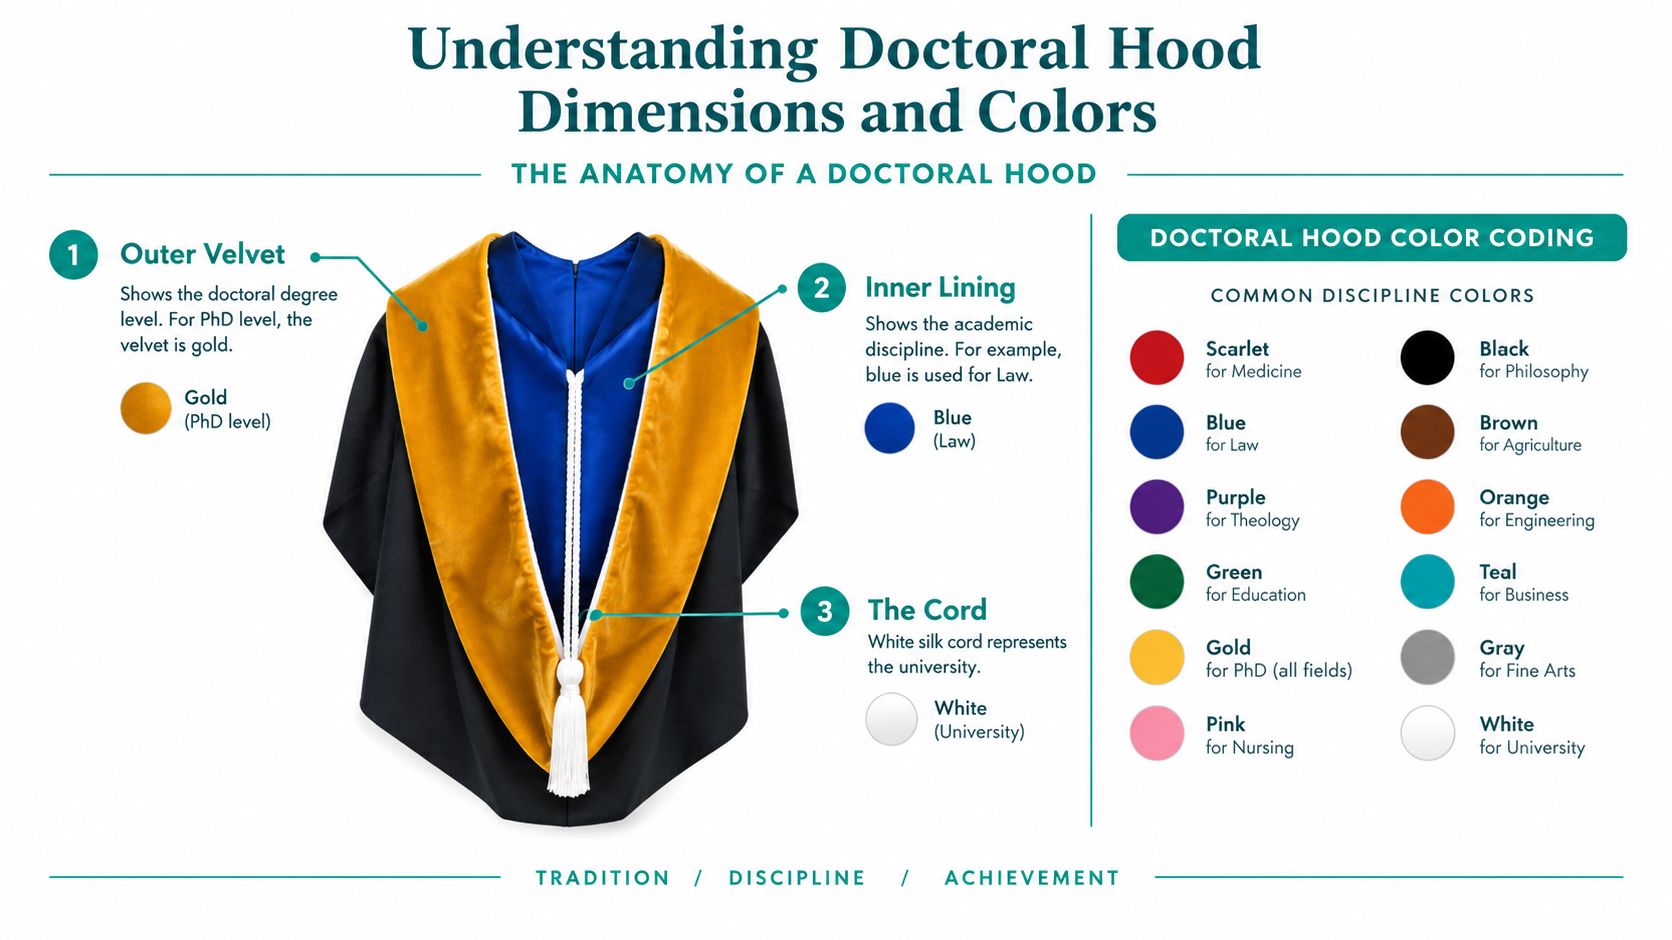
A doctoral hood is typically the longest of the three principal degree hoods, measuring approximately 4 feet in length, with velvet trim approximately 5 inches wide. A master's hood is shorter and has narrower trim, while a bachelor's hood is shorter still. The doctoral proportions create the long tail that falls down your back and the broad velvet border that must remain visible at the front.
Read the hood from the outside in
The velvet trim identifies the academic field, while the satin lining identifies the institution that granted the degree. Historical field colors include white for arts and letters, scarlet for theology, purple for law, blue for philosophy, golden yellow for science, brown for fine arts, pink for music, and green for medicine. Contemporary university guides may specify more particular combinations, so confirm your institution's rules rather than relying on a generic color chart. A practical overview of PhD regalia colors can help you understand the distinction before you order or dress.
When the hood is worn, the wide opening rests around your neck and shoulders. The pointed tail falls down your back, the velvet edge faces outward, and the lining turns outward across the back. If the hood is reversed, twisted, or left unturned, the visible signals no longer communicate your field and institution clearly. Correct placement is therefore functional, not merely photographic.
Ceremony Logistics and the Faculty Hooder Handoff
Before you put the hood over your head, answer one question: Will a faculty member place it on you during the ceremony? Universities use different procedures. The University of Cincinnati describes doctoral hooding as a faculty member placing the hood over the student's head, while other commencement instructions tell candidates to carry the folded hood until the onstage handoff. The University of Cincinnati's hooding guidance illustrates why a generic dressing sequence can create confusion.
Use this decision path:
- Check the official ceremony instructions. Look for wording such as “hooded onstage,” “faculty hooder,” “carry your hood,” or “wear your regalia.” Your graduate school or commencement office has final authority.
- If you'll be hooded onstage, don't wear the hood into the lineup unless instructed. Keep it folded as directed and bring it to the stage.
- If you must self-hood, put it on over the zipped gown before the procession. Ask someone to inspect the back before you leave the preparation area.
- If you're attending separate hooding and commencement events, verify both procedures. The expectations may differ between the two ceremonies.
Carrying the hood to the stage
Fold the hood vertically and place it over the designated arm, commonly the left arm when the ceremony instructions specify that position. Keep the narrow end facing outward and the velvet on the outside. Don't turn the satin lining fully outward or attach the loops before the handoff, because the faculty hooder needs to grasp and position the garment efficiently.
At the stage, follow the marshal's instructions. You may be asked to remove your cap or tam, turn your back to the hooder, and remain still while the hood is placed. Avoid trying to help by turning around or pulling at the fabric. The hooder needs a stable position to settle the wide opening around your shoulders and expose the lining.
Practical rule: The university's ceremony instructions determine when the hood is worn. The garment's appearance alone can't tell you whether it belongs on your shoulders before the procession.
Step-by-Step Placement and Draping Technique
For self-hooding, start with the gown rather than the hood. Put on the gown, place your arms through the correct sleeve openings, and zip it completely. A smooth gown gives the hood a stable surface, while an open or bunched zipper can make the front attachment sit too low.
Orient the hood before lifting it. Identify the narrow end, the wider shoulder opening, the velvet border, the pointed front, and the long tail. Keep the velvet on the outside. The front point should sit at the center of your chest, not off to one side.
The self-hooding sequence
- Hold the hood by the narrow end. The long tail should hang behind you, and the velvet should remain visible.
- Lower the wide opening over your head. Let it settle around your neck and shoulders without pulling it tightly.
- Center the V-shaped front. The point should align with the center of the gown zipper or your sternum.
- Turn the satin lining outward. Pull the lining across the back so the institution's colors are exposed rather than hidden inside the shell.
- Smooth the shell. Run your hands from the shoulders down the back, removing twists and bunching.
- Check the velvet edge. It should be visible at the front and lie flat over the gown.
- Attach the front and rear loops only after the drape is correct. Fasteners stabilize the hood, but they can't correct a twisted starting position.
For a visual reference on the full regalia sequence, use this guide to how to wear graduation regalia. It's especially useful if you're dressing without a coordinator nearby.
The same physical order applies during a faculty handoff, with one important difference: you don't place the hood yourself. Carry it folded, face away from the hooder, and allow the official to pull the lining outward and smooth the shell. Remain still until the velvet border, front point, and back lining are visibly settled.
Securing the Front and Rear Loops to Your Clothing
A correctly draped hood can still shift during the ceremony if you leave its attachment points unused. The front cord or loop helps hold the point near the neck and chest, while a rear loop, when the hood design provides one, helps keep the back centered on the gown. These fasteners should reduce movement, not create pressure.
Front attachment options
A shirt or blouse button is the simplest anchor. Attach the front loop to a button near the collar, then check that the hood still rests comfortably at the neck. Don't choose a low button just because it's easier to reach. A low attachment can pull the front point downward and make the velvet border buckle.
For a dress, collarless top, or garment without a usable button, use a discreet garment-compatible attachment that can hold the loop without tightening around your throat. A small sewn-in fabric loop, a suitable interior fastening point, or assistance from a marshal or dresser may work better than forcing the hood onto a decorative button. Avoid attaching it to jewelry, a lanyard, or anything that can shift independently from the garment.
Larger body sizes, mobility aids, and structured clothing can change the angle at which the hood rests. The right solution is the one that keeps the fabric stable while allowing comfortable breathing, shoulder movement, and safe walking. If the front cord feels like it's pressing into your neck, loosen or relocate the attachment and ask someone to inspect the drape from the side.
Rear stabilization
If the hood has a rear loop and the gown provides a matching button, connect them after the front is positioned. The rear attachment prevents the long tail from drifting sideways, particularly when you sit, stand, or walk across the stage. Don't tug the loop hard enough to gather the gown or distort the lining.
Ask for a back-view inspection after fastening. A hood can feel secure from the front while the lining is folded unevenly or the tail is pulling to one side. The person checking should look for a flat shell, an even lining display, and a tail that hangs naturally rather than wrapping around a shoulder.
Troubleshooting Common Fit and Display Failures
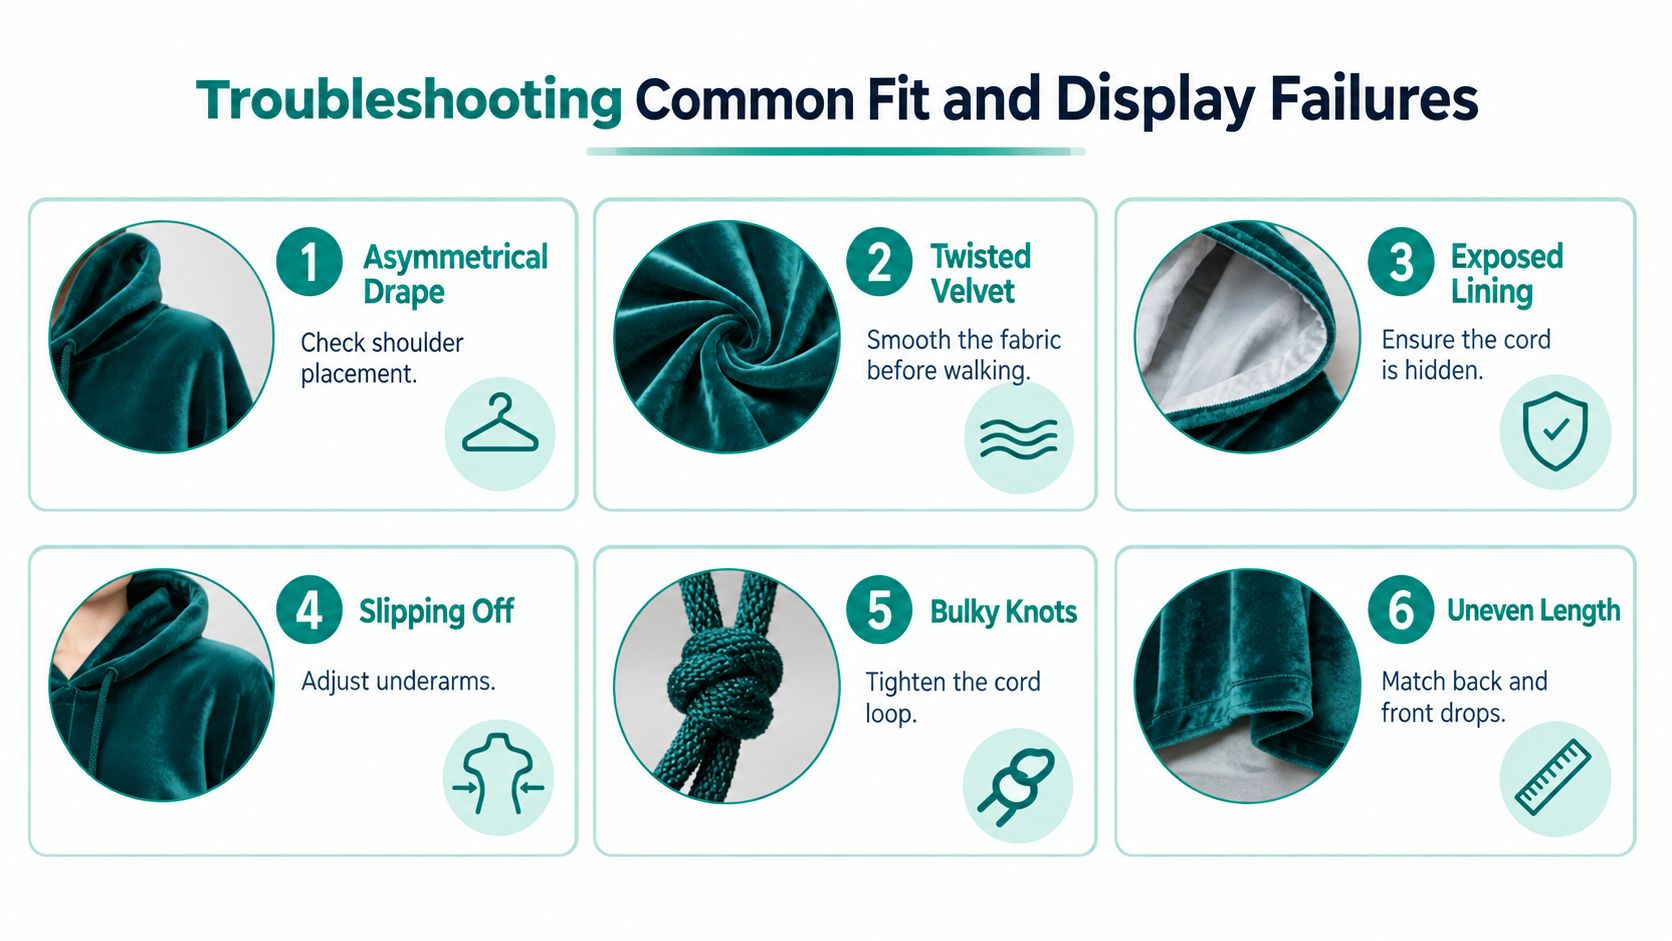
A doctoral hood can look correct in a photograph and fail during the ceremony. Walking, sitting, standing, and receiving the hood from a faculty hooder expose problems that a mirror may miss. Watch for backward sliding, throat pressure, twisted velvet, or lining that turns inward.
Diagnose the failure before removing the hood
If the hood slides backward, stop pulling the tail. Recenter the front point, inspect the front attachment, and check the rear loop. The front string should rest at the neck without pressing into it. If you need a fuller reference for orientation and placement, use this guide to wearing doctoral regalia.
If the velvet twists, hold the fabric at both shoulders and rotate it gently until the trim forms a flat line. Pulling from the front can shift the hood off-center. Ask someone nearby to check the back while you keep the front point steady.
If the lining looks uneven, smooth the satin from the center of the back toward both shoulders. It should remain visible across the back rather than gathering into a narrow strip or folding beneath the outer shell.
If an unfinished seam appears inside the tail, check the hood's orientation before joining the procession. The seam may indicate that the hood is inside out. Remove it and turn it correctly instead of concealing the seam with a pin. The University of Minnesota's guide to wearing an academic hood describes the basic arrangement shared by doctoral and master's hoods.
Get help that matches the situation
A dress, collarless garment, mobility aid, or bulky clothing can make self-adjustment difficult. Ask a marshal, dresser, or colleague to inspect the hood from behind, especially after a faculty hooder places it onstage. The handoff can leave one shoulder higher than the other, so check the back before moving away from the platform.
The checker should confirm that:
- The hood stays centered as you take several steps.
- The velvet remains flat without rolling or twisting.
- The lining stays exposed across the back.
- The attachment points feel secure without restricting your neck, shoulders, or breathing.
A stable hood should remain comfortable through movement, not merely look correct while you stand still.
Final Pre-Procession Inspection Checklist
Treat the last inspection as a movement test, not a mirror check. Stand upright, take a few steps, sit if seating is part of the lineup, and raise your arms enough to confirm that the gown and hood don't pull against each other. If you're using a wheelchair, walker, cane, or another mobility aid, test the position you'll use during the procession and ask a coordinator to inspect the back from that angle.
Run the front check
Look straight ahead and confirm that the V-shaped front is centered. The velvet border should be visible, the front point should rest naturally, and the attachment should hold the hood without creating throat pressure. If the garment has no button, confirm that your alternative attachment is secure and discreet rather than improvising with a fragile accessory.
Run the back check
Have a friend, marshal, or dresser inspect what you can't see:
- Lining: The institution's satin colors are turned outward and displayed evenly.
- Tail: The long doctoral tail falls down the back without twisting.
- Shell: The fabric lies flat across the shoulders.
- Rear loop: The attachment is connected when the hood and gown provide matching fasteners.
- Seams: No unfinished interior tail seam is visible on the outside.
- Movement: The hood stays in place when you walk and sit.
Confirm the ceremony timing one last time. If a faculty hooder will place the hood onstage, carry it folded as instructed instead of wearing it into the lineup. If you'll self-hood, complete the inspection before joining the procession, because correcting the hood in a crowded aisle is difficult and distracting.
A properly prepared hood should let you focus on the ceremony rather than on fabric. Check the institution's specific instructions, secure only what your clothing can safely support, and ask for assistance before you start walking.
Grad Store offers university-specific doctoral regalia, including hoods, gowns, tams, and accessories, along with size and color guidance for checking your order before commencement. Visit Grad Store to compare institution-specific options and prepare the hood you'll need for your ceremony.